Node’s Process Object
Node has a globally available object named process. You can use this object without a require call and it has handy properties and methods to read information from the running Node process and control its behavior.
One of things that you can read with this object is the environment variables, both the built-in ones and any custom ones you define in the OS environment before running the Node process.
For example, we can do something like:
$ VAL1=10 VAL2=20 node script.js
Note, there are no commas between the values specified before the node command.
Here’s an example script that can read the values of the environment variables we are passing above:
// script.js
console.log('Current user is', process.env.USER);
console.log('\nScript executed with:');
console.log('VAL1 equal to:', process.env.VAL1);
console.log('VAL2 equal to:', process.env.VAL2);
Here is the output of script.js as executed with the command line above:
Current user is samer
Script executed with:
VAL1 equal to: 10
VAL2 equal to: 20
The process object’s env property is an object that has all the environment properties available through the OS (for example, process.env.USER above contained the current OS user). The env object also includes the environment variables we customized, like VAL1 and VAL2.
You can also export environment variables prior to executing a script and Node can read those as well. For example, instead of the one liner command above, we can do something like:
export VAL1=100
export VAL2=200
Then, we can execute the same script.js above normally:
$ node script.js
Node will show the exported 100 and 200 values.
The process object is a handy bridge between the OS and the Node process. You can use it to communicate dynamic configuration values. For example, if you want your web-server script to use port 4242 in development and port 80 in production, you can use process.env to make the port value dynamic and control it on different machines.
There is another way to pass information for the execution context of the Node process, which is through the process.argv array. This array will have an item for every positional argument you specify when executing the node script in order. For example, if we printed the process.argv value using the handy -p CLI option like this:
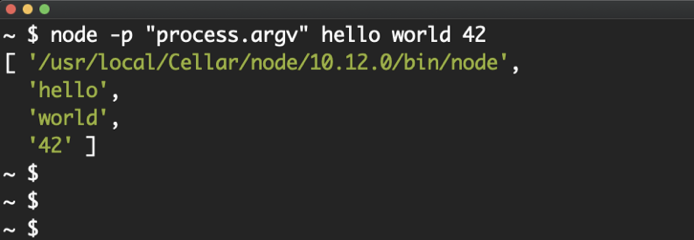
The output we get is an array of all the arguments we pass after the node command,hello, world, and 4Z. Note that this array will always contain string values.
The first item in that array is the location of the node command. Then, if we were executing a script (instead of using -p), the second item in that array will be the script name but in the usage above we’re not executing a script so the remaining items in the array were the arguments we passed to the node command.
This is a cool feature, but I think I prefer the process.env method because I get to name the passed values there. With argv, we’d have to do more tricks to accomplish the named-values feature.
Other properties you should be aware of on this special process object are the standard input output (stdio) objects. There are 3 of them: process.stdin (for input), process.stdout (for output), and process.stderr (for error output).
These objects control the communication channels between the Node process and its OS execution environment. We have been using them under the hood! When you use a console.log line, that line writes to the stdout object. In fact, you can accomplish the same functionality of console.log by using a process.stdout.write line:
process.stdout.write('hello node!\n');
The stdin object can be used to read information from the OS process. Here’s an example on how to do that:
// echo.js
process.stdin. on('readable', () => {
  const chunk = process.stdin.read();
  if (chunk !== null) {
    process.stdout. write(chunk);
  }
});
All of the process stdio objects are streams, which is a topic we have yet to explore, but the gist of it is that we can use events and methods to consume these streams. In the script above, we are listening for a readable event and using the read() method to read a chunk of data. Then, we print out the same chunk to stdout, making the script effectively an echo utility. It’ll echo everything you type to it.
There are multiple ways to consume and benefit from these stdio streams (and streams in general). For example, the same echo example above can be done using the excellent pipe function that’s available on readable streams:
// echo2.js
process.stdin.pipe(process.stdout);
We just pipe a readable stream (like process.stdin) into a writable one (like process.stdout) using the argument for the pipe function and this makes the exact same echo utility.
| We’ll learn more about streams in upcoming articles but for now just make a mental note that STREAMS ARE AWESOME! and you should utilize them in every possible way. |
Node’s process object can also be used to terminate the process or do something when the process is terminated unexpectedly. Here is an example of that:
// process-exit.js
setTimeout(() => process.exit(), 2000);                      // 1

process.on('exit', () => {                                   // 2
  console.log('Process will exit now. See you later!');      // 3
});                                                          // 4

console.log('Hello!');                                       // 5
This code will start a timer that will fire after 2000 milliseconds and it will call the exit function on the process object. This will manually terminate the process and make Node exit. As Node is exiting the process, it looks for any listeners registered on the exit event. We have done exactly that in the script above, which means right before Node exits it will execute the registered function (lines 2–4) and print out the “Process will exit now. See you later!” message.
$ node process-exit.js
Hello!
Then, after 2 seconds:
Process will exit now. See you later!
Because of the nature of asynchronous code in Node, the “Hello!” line was executed first. Then the timer function was executed and the exit listener function was invoked. This simple example demonstrates the power of node asynchronous nature and its event-based methodology. We will learn more about that in upcoming articles.
So what exactly was that timer feature that we used in the script above? Let’s talk about that next.